XLOOKUP Add-In for Excel 2013, 2016 and 2019 Download
The XLOOKUP add-in enables you to use the only Microsoft 365 compatible function under Excel 2010, Excel 2013, Excel 2016, and Excel 2019.
Steps to add XLOOKUP function for Excel 2013, 2016 and 2019
- Open Excel
- On the Developer Tab, click Excel Add-ins
- Click Browse and select the add-in
- Click OK
- XLOOKUP add-in is installed
https://github.com/Excel-DNA/XFunctions/releases
Download the Add-in GitHub Link
Download the add-in file
Using the .NET Intellisense integration, the add-in provides native Excel tooltips. Once the add-in is installed, you can use the DXLOOKUP function. It is equal to the Microsoft 365 version.
Here is a simple left-lookup example:
How to install an Excel Add-in
The Developer Tab
This section will learn how to enable and show the Developer tab on the ribbon. It’s a key step before you install an Excel add-in. Locate the Developer Tab first because it’s hidden by default.
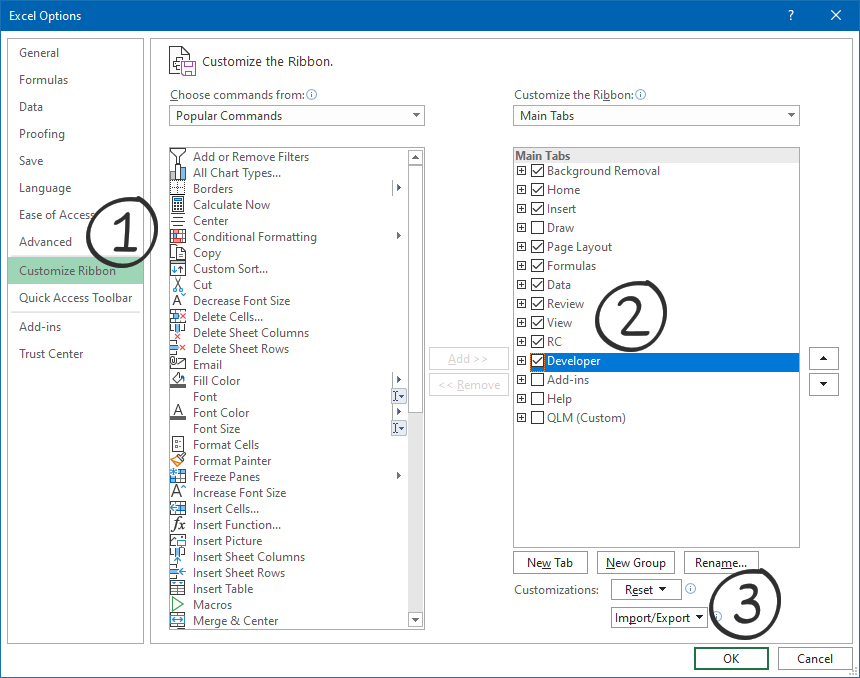
Steps to enable the Developer tab:
- Locate the ribbon and right-click on the Home Tab.
- Click the ‘Customize the ribbon…’ option, and the Excel Options box will appear.
- Choose the ‘Customize the ribbon’ option.
- OK, now we have the Excel Options box.
- You’ll see the active tabs on the right side of the main window. Activate the Developer Tab.
- After clicking OK, the Developer tab will appear.
Install an Excel add-in
To install an Excel add-in, follow these simple steps below:
- First, download the file to your local drive. Next, unzip the file if it has a zip format. Finally, place the “xlam” file in your Documents folder or your preferred location.
- Locate the Developer tab and click the Excel add-ins section. After clicking this tab, you will get a new window.
- Click Browse and locate the main file.
- The installed file will appear in the list. Finally, click OK to close the window.
Watch this tutorial below if you want to install an add-in using a faster way.
Disappearing Add-in ribbon
Sometimes, you need to do additional steps. One of the most frustrating issues is the disappearing add-in ribbon effect. A recent Excel update has caused add-in Ribbon Menu Bars to disappear when Excel is opened. We’ll show the solution on how to fix it. Let us see the answers!
If your add-in has not appeared on the ribbon, unblock the file or move the file to a trusted location. You will learn how to do it.
The difference between .xlsx and .xlsm (.xlam) files is that nothing will happen if you open a regular (macro-free) Excel file. Excel will never inform you if you work with add-in files; you can open the file without any security message.
Unblocking add-ins
The file is blocked by default when you get the macro-enabled file from the internet.
Steps to unblock an Excel file:
- Right-click the add-in file
- Select Properties
- Locate the General tab, Security section.
- Mark the Unblock box checked
- Click the OK

Restart Excel and your add-in will appear on the ribbon.
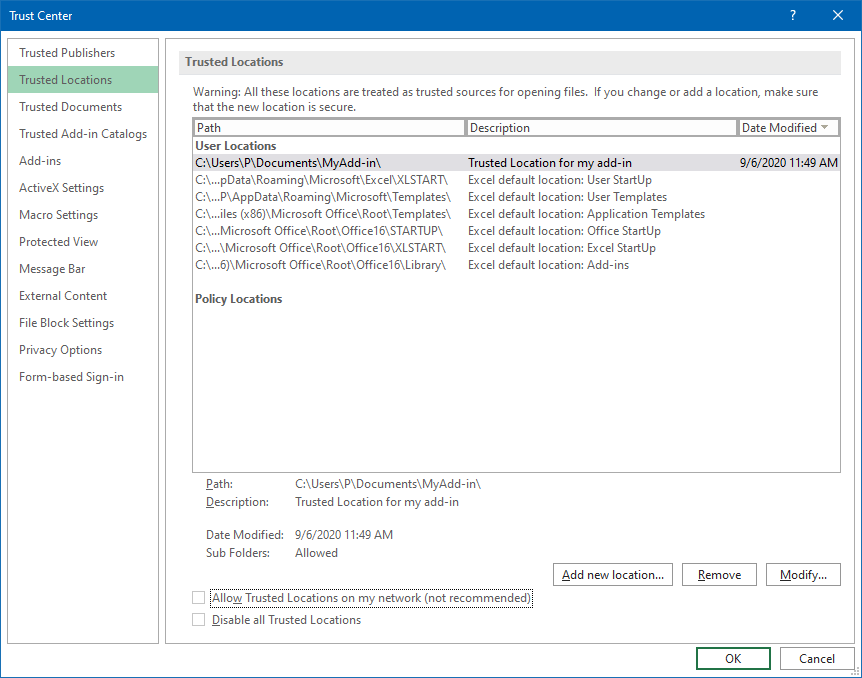
Trusted locations
When the unblocking method does not help, you must move the file (folder) to a trusted location.
How do you add an Excel add-in to the Trusted Location?
- Select the following path: File > Options > Trust Center > Trust Center Settings > Trusted Location
- Click ‘Add new Location’
- Click ‘Browse’ to select the folder that contains the main file
- Select OK to close the Trust Center window
- Finally, restart Microsoft Excel